DI in Zenject 2(Non-mono, SignalBus and Factory)
— Unity development, Design Pattern — 3 min read
1. Non-mono
In some cases, it is preferable to avoid the extra weight of MonoBehaviours in favor of just normal C# classes. Zenject allows you to do this much more easily by providing interfaces that mirror functionality that you would normally need to use a MonoBehaviour for. Then you can use the Unity lifecycle without the need of attaching it to the scene. For example, the BlueTooth service start at the initialization of the game and stops when the game stop, but it doesn’t make sense to attach to the scene to fulfill the function.
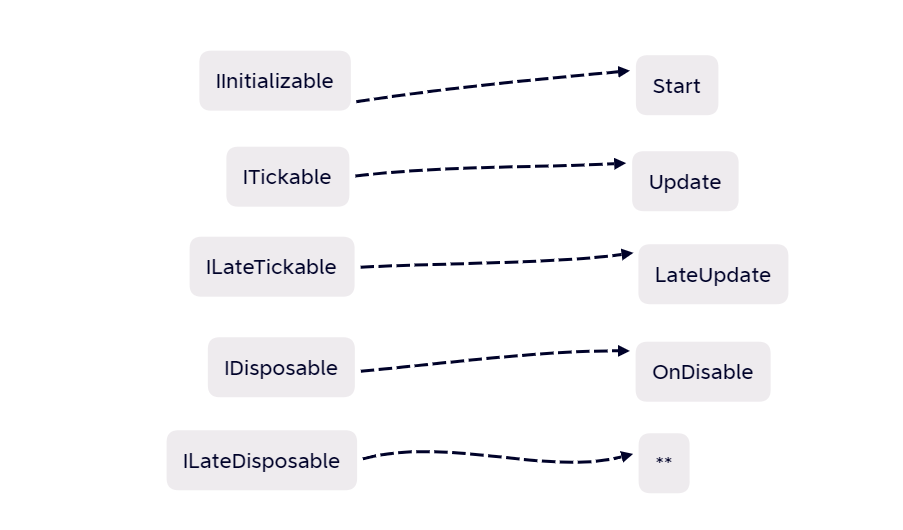
To use the interfaces above, you have to bind multiple interfaces to a single instance:
1Container.Bind(typeof(Foo), typeof(IInitializable), typeof(IDisposable)).To<Logger>().AsSingle();It can be made simpler by this:
1Container.Bind(new[] { typeof(Foo) }.Concat(typeof(Foo).GetInterfaces())).To<Foo>().AsSingle();This pattern is useful enough that Zenject includes a custom bind method for it. The above code is equivalent to:
1Container.BindInterfacesAndSelfTo<Foo>().AsSingle();2
3Container.BindInterfacesTo<Foo>().AsSingle();2. Factory
When create new objects dynamically, using the instantiate method won’t automatically bind the instance to the container, and it’s not injected to the container. The factory is there to solve this problem.
The following method will get a null exception for _player, because the Player instance was never injected to the SimpleEnemy Class
1public class SimpleEnemy:MonoBehaviour2 {3 private Player _player;4
5 [Inject]6 void Constructor(Player player)7 {8 Debug.Log("Run constructor in mono");9 _player = player;10 }11
12 private void Update()13 {14 if (Input.GetKeyDown(KeyCode.P))15 {16 //Error: cannot find _player instance.17 Debug.Log("Enemy " +this.GetHashCode() +"with Player "+_player.GetHashCode());18 }19 }20 }By implementing a Factory class which is derived from PlaceholderFactory, the SimpleEnemy class can be instantiate by a SimpleEnemy.Factory.Create() method.
1//without parameter2public class SimpleEnemy:MonoBehaviour3 {4 private Player _player;5
6 [Inject]7 void Constructor(Player player)8 {9 Debug.Log("Run constructor in mono");10 _player = player;11 }12
13 private void Update()14 {15 if (Input.GetKeyDown(KeyCode.P))16 {17 Debug.Log("Enemy " +this.GetHashCode() +"with Player "+_player.GetHashCode());18 }19 }20
21 public class Factory : PlaceholderFactory<SimpleEnemy>{ }22 }23
24public class GameLogic : MonoBehaviour25 {26 private Player _player;27 private SimpleEnemy.Factory _simpleEnemyFactory;28
29 [Inject]30 private void Constructor(Player player,SimpleEnemy.Factory simpleEnemyFactory)31 {32 _player = player;33 _simpleEnemyFactory = simpleEnemyFactory;34 }35 public void InstantiateEnemy()36 {37 SimpleEnemy enemy = _simpleEnemyFactory.Create();38 Debug.Log("Create enemy" + enemy.name);39 }40 }41
42public class GameInstaller : MonoInstaller43 {44 [SerializeField]45 private SimpleEnemy simpleEnemyPrefab;46 public override void InstallBindings()47 {48 Container.Bind<Player>().AsSingle();49 //note that you have to use FromComponentInNewPrefab() or similar methods to instantiate a Mono Prefab50 Container.BindFactory<SimpleEnemy, SimpleEnemy.Factory>().FromComponentInNewPrefab(simpleEnemyPrefab).AsSingle();51 }52 }53
54public class Player55 {56 Player()57 {58 Debug.Log("Player spawned" + this.GetHashCode());59 }60 }You can also configure parameters when call the Create() function:
1public class Enemy2{3 readonly Player _player;4 readonly float _speed;5
6 public Enemy(float speed, Player player)7 {8 _player = player;9 _speed = speed;10 }11
12 public class Factory : PlaceholderFactory<float, Enemy>13 {14 }15}16
17public class EnemySpawner : ITickable18{19 readonly Enemy.Factory _enemyFactory;20
21 public EnemySpawner(Enemy.Factory enemyFactory)22 {23 _enemyFactory = enemyFactory;24 }25
26 public void Tick()27 {28 if (ShouldSpawnNewEnemy())29 {30 var newSpeed = Random.Range(MIN_ENEMY_SPEED, MAX_ENEMY_SPEED);31 var enemy = _enemyFactory.Create(newSpeed);32 // ...33 }34 }35}36
37public class TestInstaller : MonoInstaller38{39 public override void InstallBindings()40 {41 Container.BindInterfacesTo<EnemySpawner>().AsSingle();42 Container.Bind<Player>().AsSingle();43 Container.BindFactory<float, Enemy, Enemy.Factory>();44 }45}** The Factory pattern in Zenject can also be used for controlling a State-Machine. You can find the example of a State-Machine for SpaceShip in the First Zenject Sample Project.
3. Signal Bus
3.1 Motivation / Theory
Given two classes A and B that need to communicate, your options are usually:
- Directly call a method on B from A. In this case, A is strongly coupled with B.
- Inverse the dependency by having B observe an event on A. In this case, B is strongly coupled with A
As a third option, in some cases it might actually be better for neither one to know about the other. This way your code is kept as loosely coupled as possible. You can achieve this by having A and B interact with an intermediary object (in this case, zenject signals) instead of directly with each other.
Note also that while the result will be more loosely coupled, this isn't always going to be better. Signals can be misused just like any programming pattern, so you have to consider each case for whether it's a good candidate for them or not.
1public class Greeter : IInitializable, IDisposable2{3 readonly SignalBus _signalBus;4
5 public Greeter(SignalBus signalBus)6 {7 _signalBus = signalBus;8 }9
10 public void Initialize()11 {12 _signalBus.Subscribe<UserJoinedSignal>(OnUserJoined);13 }14
15 public void Dispose()16 {17 _signalBus.Unsubscribe<UserJoinedSignal>(OnUserJoined);18 }19
20 void OnUserJoined(UserJoinedSignal args)21 {22 SayHello(args.Username);23 }24
25 public void SayHello(string userName)26 {27 Debug.Log("Hello " + userName + "!");28 }29}30
31public class GameInstaller : MonoInstaller<GameInstaller>32{33 public override void InstallBindings()34 {35 SignalBusInstaller.Install(Container);36
37 Container.DeclareSignal<UserJoinedSignal>();38
39 // Here, we can get away with just binding the interfaces since they don't refer40 // to each other41 Container.BindInterfacesTo<Greeter>().AsSingle();42 Container.BindInterfacesTo<GameInitializer>().AsSingle();43 }44}The signal is a class, Any parameters passed along with the signal should be added as public members or properties. For example:
1public class WeaponEquippedSignal2{3 public Player Player;4 public IWeapon Weapon;5}After we have created our signal class we just need to declare it in an installer somewhere:
1Container.DeclareSignal<PlayerDiedSignal>();3.2 Signal Firing
To fire the signal, you add a reference to the SignalBus class, and then call the Fire method like this:
1public class UserJoinedSignal2{3}4
5public class UserManager6{7 readonly SignalBus _signalBus;8
9 public UserManager(SignalBus signalBus)10 {11 _signalBus = signalBus;12 }13
14 public void DoSomething()15 {16 _signalBus.Fire<UserJoinedSignal>();17 }18}Or, if the signal has parameters then you will want to create a new instance of it, like this:
1public class UserJoinedSignal2{3 public string Username;4}5
6public class UserManager7{8 readonly SignalBus _signalBus;9
10 public UserManager(SignalBus signalBus)11 {12 _signalBus = signalBus;13 }14
15 public void DoSomething()16 {17 _signalBus.Fire(new UserJoinedSignal() { Username = "Bob" });18 }19}When Fire() is called, SignalBus expects the signal to be declared and exception will be thrown if the signal is not declared. If you want to call Fire() regardless of the signal declaration, use TryFire() method instead that ignores undeclared signals. You can use TryFire() looks like this:
1public class UserJoinedSignal2{3}4
5public class UserManager6{7 readonly SignalBus _signalBus;8
9 public UserManager(SignalBus signalBus)10 {11 _signalBus = signalBus;12 }13
14 public void DoSomething()15 {16 // Generic version17 _signalBus.TryFire<UserJoinedSignal>(); // Nothing happens if UserJoinedSignal is NOT declared18
19 // Non-Generic version20 _signalBus.TryFire(new UserJoinedSignal()); // Nothing happens if UserJoinedSignal is NOT declared21 }22}As a result of this, signals are not enabled automatically, so you have to explicitly install them yourself by calling SignalBusInstaller.Install(Container)
in one of your installers.
3.3 abstract signal
1public class Example2{3SignalBus signalBus;4public Example(Signalbus signalBus) => this.signalBus = signalBus;5
6public void CheckpointReached() => signalBus.AbstractFire<SignalCheckpointReached>();7
8public void CompleteLevel() => signalBus.AbstractFire<SignalLevelCompleted>();9}10
11public class SaveGameSystem12{13public SaveGameSystem(SignalBus signalBus)14{15signalBus.Subscribe<ISignalGameSaver>(x => SaveGame());16}17
18void SaveGame() { /*Saves the game*/ }19}20
21//in your installer22Container.DeclareSignalWithInterfaces<SignalLevelCompleted>();23Container.DeclareSignalWithInterfaces<SignalCheckpointReached>();24
25//your signal types26public struct SignalCheckpointReached : ISignalGameSaver{}27public struct SignalLevelCompleted : ISignalGameSaver{}28
29public interface ISignalGameSaver{}3.4 When To Use Signals
Signals are most appropriate as a communication mechanism when:
- There might be multiple interested receivers listening to the signal
- The sender doesn't need to get a result back from the receiver
- The sender doesn't even really care if it gets received. In other words, the sender should not rely on some state changing when the signal is called for subsequent sender logic to work correctly. Ideally signals can be thought as "fire and forget" events
- The sender triggers the signal infrequently or at unpredictable times
Note: You can do this in Zenject out-of-the-box by executing the menu item Edit -> Zenject -> Validate Current Scene or simply hitting SHIFT+ALT+V with the scenes open that you want to validate.
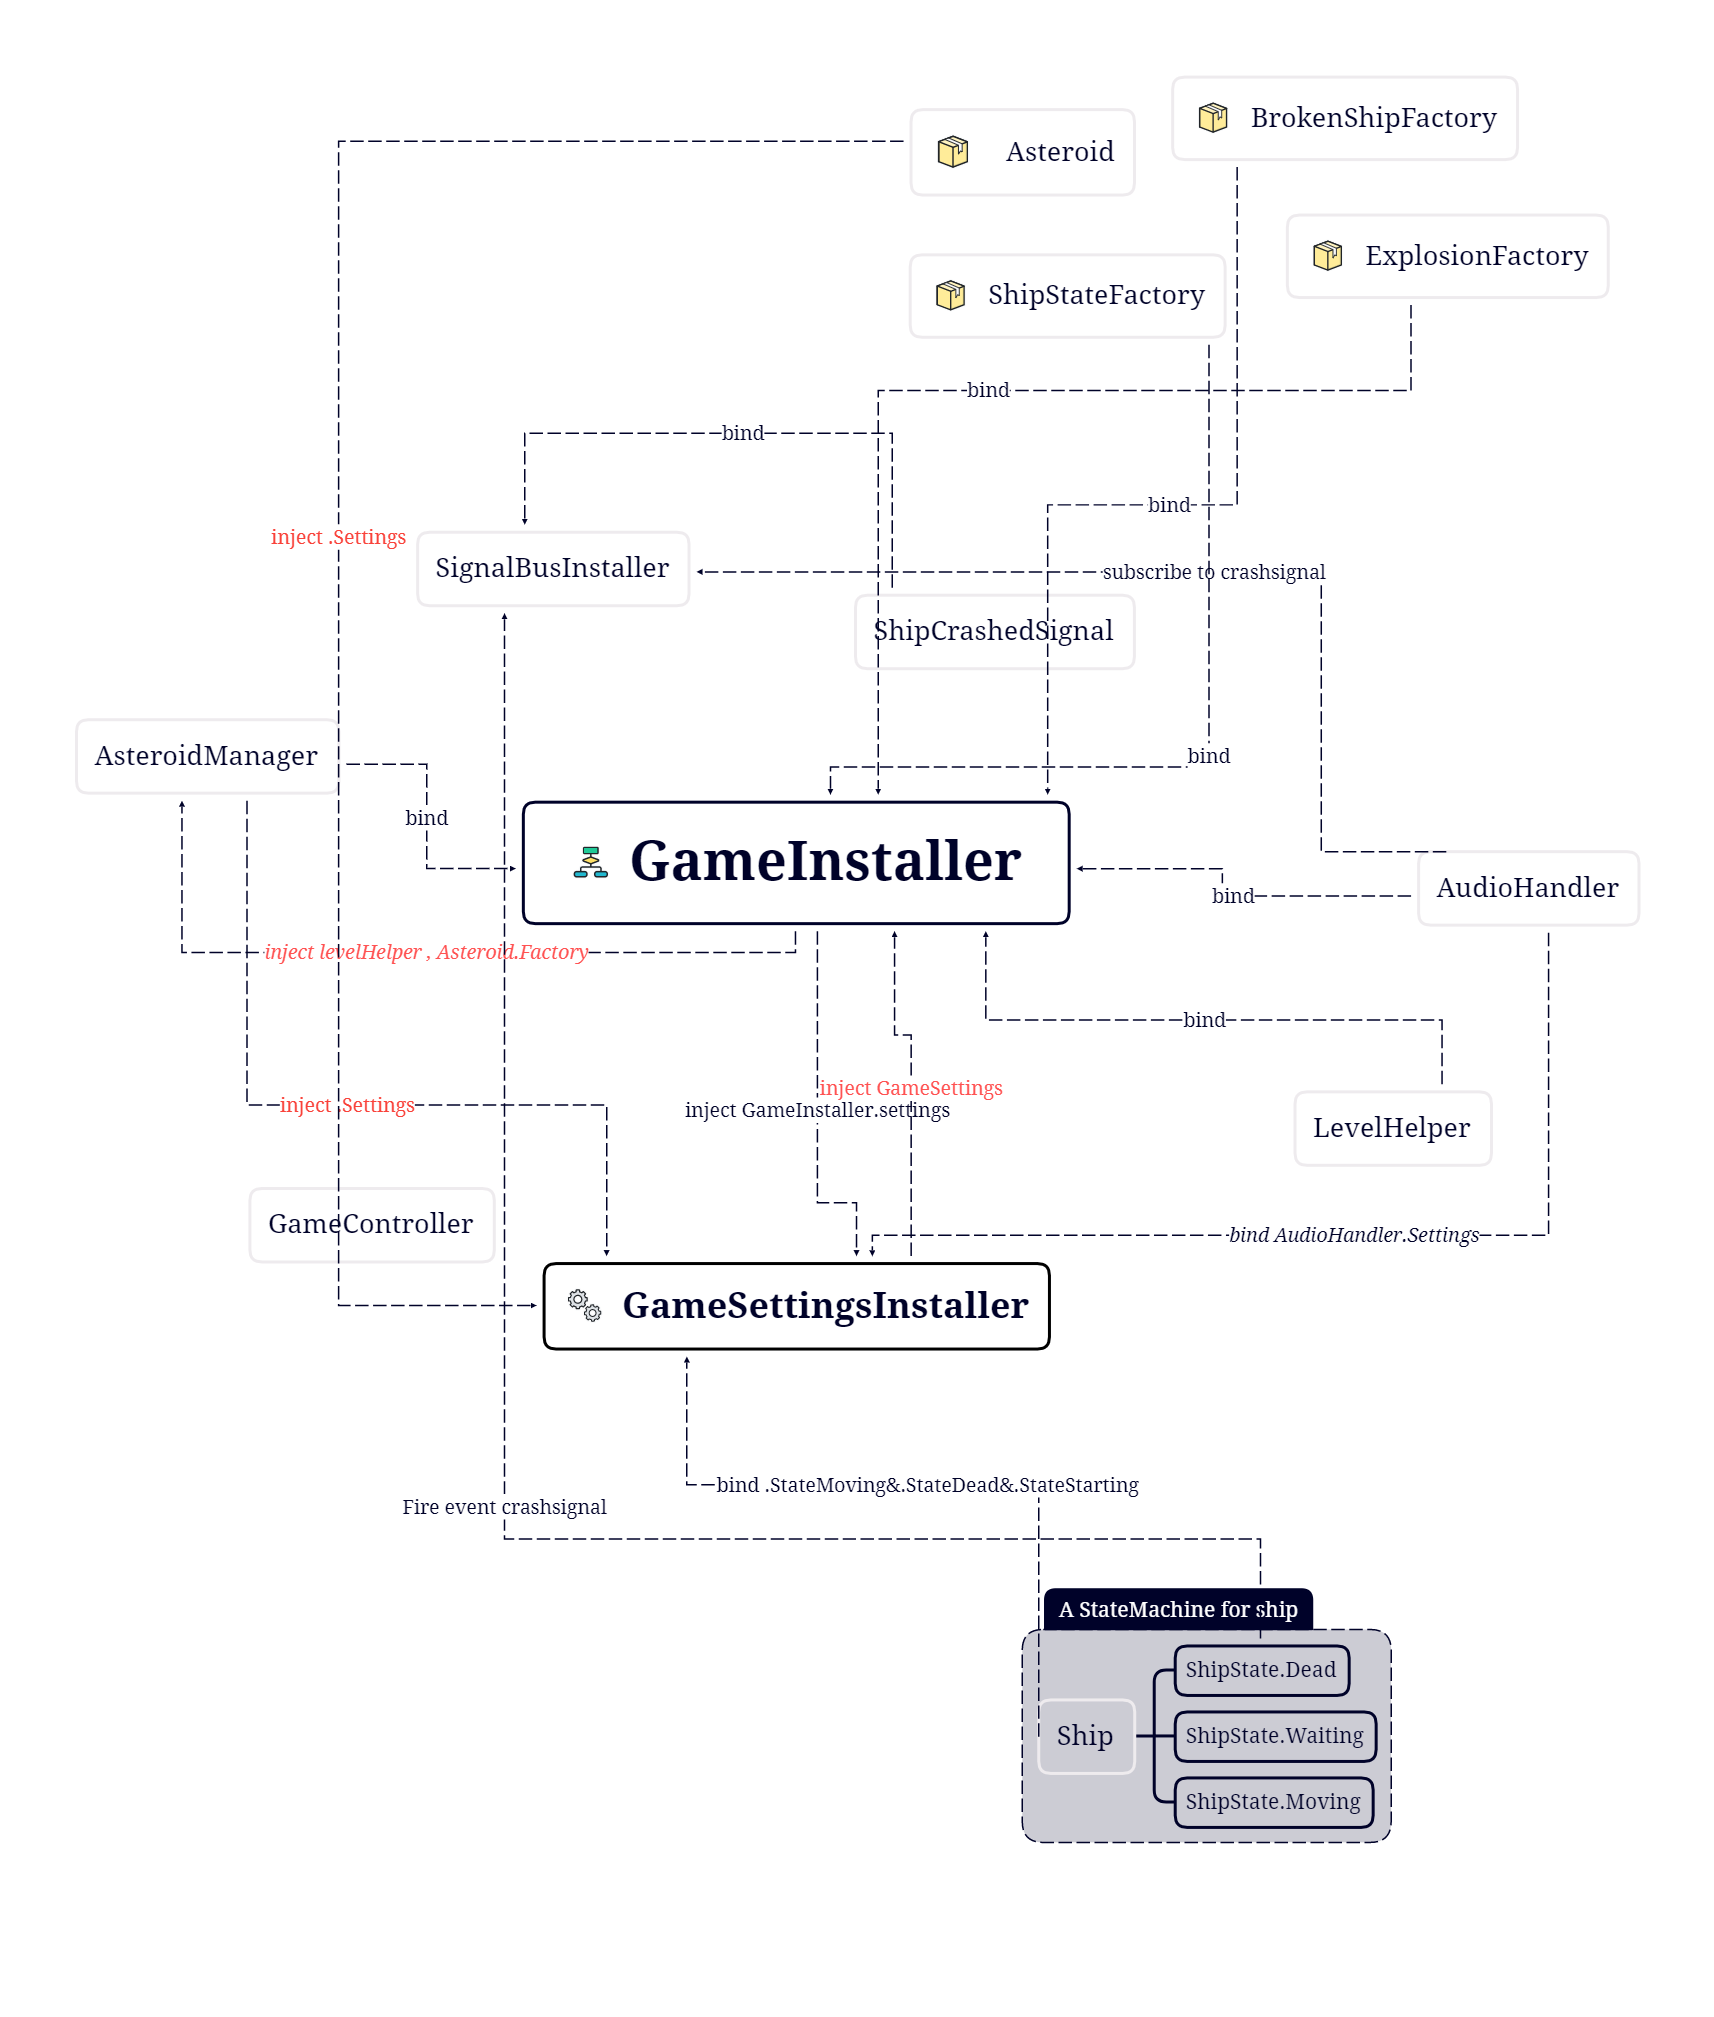
4.Example1
After learning basic concepts about injection, binding, Installer, and other topics about the non-mono interface, Factory and Signal Bus, it’s sufficient to understand the first Sample that was given in the Zenject package.
Reference
https://github.com/modesttree/Zenject/blob/master/Documentation/Factories.md
https://github.com/modesttree/Zenject
https://erdiizgi.com/dependency-injection-unity-zenject/
https://www.youtube.com/watch?v=6tn8pMQuxEk&list=PLKERDLXpXljNJPY2czQcfPXW4BJaGZc&index=2
https://blog.csdn.net/unity3d_xyz/category_8487718.html
https://github.com/modesttree/Zenject/blob/master/Documentation/Signals.md