DI in Zenject 1 (Basic concepts and Hello world)
— Unity development, Design Pattern — 3 min read
1. Zenject Hello world
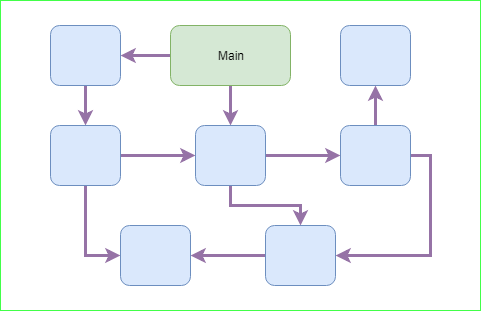
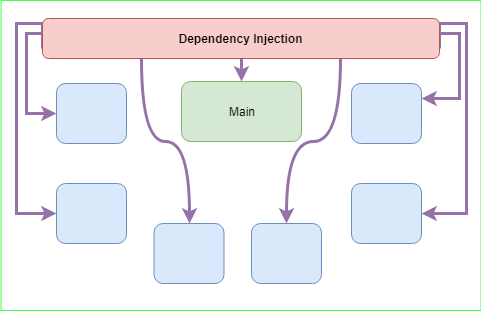
Zenject is a lightweight highly performant DI(dependency injection) framework built specifically to target Unity 3D. The traditional way of handling dependency can cause a lot of issues, like referring to a single dependency repeatedly, and easy cause errors while changing a dependency.
The workflow of Zenject(and most DI framework) are as follow:
- Bind the dependency into the Zenject DiContainer
- Inject the dependency into different code blocks
Just that simple.
To get Zenject work for the first time, you can follow the Hello world example from the official documentation.
If you are new to this topic, you should pause here and go to checkout the example and then come back.
2. Zenject Inject
There are four types of Zenject injections:
1 - Constructor Injection
1public class Foo2{3 IBar _bar;4
5 public Foo(IBar bar)6 {7 _bar = bar;8 }9}2 - Field Injection
1public class Foo2{3 [Inject]4 IBar _bar;5}Field injection occurs immediately after the constructor is called. All fields that are marked with the [Inject] attribute are looked up in the container and given a value. Note that these fields can be private or public and injection will still occur.
3 - Property Injection
1public class Foo2{3 [Inject]4 public IBar Bar5 {6 get;7 private set;8 }9}4 - Method Injection
1public class Foo2{3 IBar _bar;4 Qux _qux;5
6 [Inject]7 public void Init(IBar bar, Qux qux)8 {9 _bar = bar;10 _qux = qux;11 }12}Note the following:
- Inject methods are the recommended approach for MonoBehaviours , since MonoBehaviours cannot have constructors.
- Note however that it is usually not a good idea to use inject methods for initialization logic. Often it is better to use IInitializable.Initialize or Start() methods instead, since this will allow the entire initial object graph to be created first.
- The best practice is to prefer constructor/method injection compared to field/property injection.
- For further information go to check Introduction to Zenject API / Injection
3. Zenject Bind
Every dependency injection framework is ultimately just a framework to bind types to instances.
In Zenject, dependency mapping is done by adding bindings to something called a container. The container should then 'know' how to create all the object instances in your application, by recursively resolving all dependencies for a given object.
3.1 Bind to container
Each Zenject application therefore must tell the container how to resolve each of these dependencies, which is done via Bind commands. For example, given the following class:
1public class Foo2{3 IBar _bar;4
5 public Foo(IBar bar)6 {7 _bar = bar;8 }9}You can wire up the dependencies for this class with the following:
1Container.Bind<Foo>().AsSingle();2Container.Bind<IBar>().To<Bar>().AsSingle();A full type of binding options are as follow. Most of which have their default setup. More details can be found in the documentation
1Container.Bind<ContractType>()2 .WithId(Identifier)3 .To<ResultType>()4 .FromConstructionMethod()5 .AsScope()6 .WithArguments(Arguments)7 .OnInstantiated(InstantiatedCallback)8 .When(Condition)9 .(Copy|Move)Into(All|Direct)SubContainers()10 .NonLazy()11 .IfNotBound();tips: to get a better understanding the first time, you can use.GetHashCode to check out if the instances are the same
3.2 Other Bindings
zenject binding
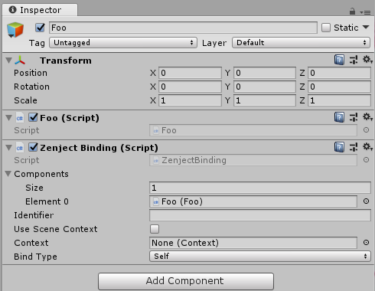
Yet another way to do this is to use the ZenjectBinding component. You can do this by adding a ZenjectBinding MonoBehaviour to the same game object that you want to be automatically added to the Zenject container.
For example, if you have a MonoBehaviour of type Foo in your scene, you can just add ZenjectBinding alongside it, and then drag the Foo component into the Component property of the ZenjectBinding component.
3.3 Game Object Bind Methods
For bindings that create new game objects (eg. FromComponentInNewPrefab, FromNewComponentOnNewGameObject, etc.) there are also two extra bind methods.
- WithGameObjectName = The name to give the new Game Object associated with this binding.
- UnderTransformGroup(string) = The name of the transform group to place the new game object under. This is especially useful for factories, which can be used to create many copies of a prefab, so it can be nice to have them automatically grouped together within the scene hierarchy.
- UnderTransform(Transform) = The actual transform to place the new game object under.
- UnderTransform(Method) = A method to provide the transform to use.
3.4 Conditional Binding
In many cases you will want to restrict where a given dependency is injected. You can do this using the following syntax:
1Container.Bind<IFoo>().To<Foo1>().AsSingle().WhenInjectedInto<Bar1>();Note that WhenInjectedInto is a simple shorthand for the following, which uses the more general When() method:
1Container.Bind<IFoo>().To<Foo>().AsSingle().When(context => context.ObjectType == typeof(Bar));The InjectContext class (which is passed as the contextparameter above) contains a variety of information that you can use in your conditional, you can check here for further queries.
4. Zenject Installer
Often, there is some collections of related bindings for each sub-system and so it makes sense to group those bindings into a re-usable object. In Zenject this re-usable object is called an 'installer'. You can define a new installer as follows:
1public class FooInstaller : MonoInstaller2{3 public override void InstallBindings()4 {5 Container.Bind<Bar>().AsSingle();6 Container.BindInterfacesTo<Foo>().AsSingle();7 // etc...8 }9}You add bindings by overriding the InstallBindings method, which is called by whatever Context
the installer has been added to (usually this is SceneContext). Installers are installed in the order given to SceneContext(with scriptable object installers first, then mono installers, then prefab installers)
Because the installer is simply a collection, you can also call installer in another installer, For example (which makes the management easier):
1public class BarInstaller : Installer<BarInstaller>2{3 public override void InstallBindings()4 {5 ...6 }7}8
9public class FooInstaller : MonoInstaller10{11 public override void InstallBindings()12 {13 BarInstaller.Install(Container);14 }15}5. Usage of inspector in Zenject
5.1 Using Serializable
One implication of writing most of your code as normal C# classes instead of MonoBehaviour's is that you lose the ability to configure data on them using the Unity inspector. You can however still take advantage of this in Zenject by using the following pattern:
1using System;2using UnityEngine;3using Zenject;4
5namespace zenject.nonmonobehaviour6{7 public class ZenjectNonMonobehaviour : MonoInstaller<ZenjectNonMonobehaviour>8 {9 public ZenjectInspector.Settings Settings;10
11 public override void InstallBindings()12 {13 //The first way to expose the settings in the inspector14 //Container.BindInstance(Settings);15 //Container.BindInterfacesTo<ZenjectInspector>().AsSingle().NonLazy();16
17 //The second way to expose the settings in the inspector18 Container.BindInterfacesTo<ZenjectInspector>().AsSingle().WithArguments(Settings);19 }20 }21
22 public class ZenjectInspector : ITickable23 {24 private Settings mSettings;25
26 public ZenjectInspector(Settings settings)27 {28 this.mSettings = settings;29 }30
31 public void Tick()32 {33 Debug.Log("Speed:" + mSettings.Speed);34 }35
36 [Serializable]37 public class Settings38 {39 public float Speed;40 }41 }42}5.2 Using Scriptable Object Installer
- Open Unity
- Right click somewhere in the Project tab and select
Create -> Zenject -> ScriptableObjectInstaller - Name it GameSettingsInstaller
- Right click again in the same location
- Select the newly added menu item
Create -> Installers -> GameSettingsInstaller
1public class GameSettings : ScriptableObjectInstaller2{3 public Player.Settings Player;4 public SomethingElse.Settings SomethingElse;5 // ... etc.6
7 public override void InstallBindings()8 {9 Container.BindInstances(Player, SomethingElse, etc.);10 }11}12
13public class Player : ITickable14{15 readonly Settings _settings;16 Vector3 _position;17
18 public Player(Settings settings)19 {20 _settings = settings;21 }22
23 public void Tick()24 {25 _position += Vector3.forward * _settings.Speed;26 }27
28 [Serializable]29 public class Settings30 {31 public float Speed;32 }33}Bind , Installer and inject are the most important concepts in Zenject. In the next post, I will talk about Non-mono Classes, Signal bus for event handling, and Factory.
Reference
https://github.com/modesttree/Zenject
https://erdiizgi.com/dependency-injection-unity-zenject/
https://www.youtube.com/watch?v=6tn8pMQuxEk&list=PLKERDLXpXljNJPY2czQcfPXW4BJaGZc&index=2